


VX7010
Software Update Procedure
Click Here to Download 7010.1002.zip
Using This Software Update
This software
update disables the learning ability of the built-in VX7010 SWC interface. Use this software if your SWC controls will not program
correctly with your vehicle make and model. After
using this update, you will need to purchase a third-party SWC adapter. See
item 1 below.
Software is not interchangeable between models.
This update is for the head unit OS only. This update is not a navigation
update.
This update
addresses the following items:
- SWC updated to pre-defined PAC protocol. SWC learning capability
disabled. A third-party adapter (Such as the PAC SWI-RC) must be used after this update in
order to interface the VX7010 to an OE steering wheel with function
controls.
- Adds programmable Turn-On volume. To access function, rotate
rotary encoder to the desired Turn-On volume. While the green volume bar
is displayed, press and hold the rotary encoder for 2 seconds.
- Corrected Bluetooth / Back-Up camera issue. Condition: Back-Up
camera is installed and backing up while on a BT call. When the vehicle is
placed in “drive”, the BT call will transfer to the phone.
- Added Back-Up camera image compensation – Normal / Mirror Image.
- Keyless Disc Eject. To access function, when vehicle is OFF (Key
out of the ignition), press the Eject button momentarily.
- Pandora icon moved to 1st page of Main Source Menu.
- Volume can be adjusted when back-up camera is active.
Preparing
the MicroSD card
Note: MicroSD card should be formatted FAT32 before update procedure. Use a
4GB or 8GB MicroSD card.
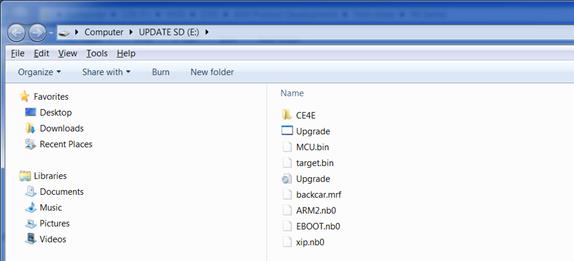
Unzip the software
update folder. Place the update files into the ROOT directory of a blank MicroSD card. There should be no folders
on the MicroSD card except the
folder contained within the update files. See below image for reference.
Beginning
the Update
Note: When updating the unit, make certain that power
is not interrupted while the update is in
progress. If power is lost or interrupted the unit may become inoperable. Also, before starting the update, turn-off Demo Mode in the
“Settings Menu” (Go to the Settings Menu > General > Demo Mode > OFF).
- Remove the navigation MicroSD card from the unit and set aside. Do
not modify or delete any files on the factory navigation MicroSD card.
Insert the MicroSD card with the update files into the MicroSD card slot.
- Power the unit ON.
- The update process will begin automatically upon power up.
- After a few moments, a TFT calibration screen will display on the
TFT.
- Press and hold the “cross hair” with your index finger until it
moves to the next calibration sector.
- After you press and hold top right-hand corner for calibration,
the screen will ask you to “tap” the TFT again to save the settings. Tap
the TFT.
- After the next update section, a display prompt will ask you to
remove the MicroSD card. Remove the card.
- The update will continue and the unit will reboot.
- Updates are now complete.
- Go to the Settings Menu
> General > Demo Mode > OFF.
- Go to the Settings Menu
> Version.
- Check version installed to
ensure the update was successful.
Software Version Numbers
(7010.1002)
Model:
VX7010
MCU: v1.13 Jun 11 2015
MPEG:
01140522
SERV:
9b150060
BT: 6.6
MPU: 402.166.v1.19_150619
OS: v3.46-07 2015-05-03
End of Document